
A few weeks ago I received a text from my friend Jenny saying that she “left a small present” on my front steps to thank me for the dinner I had prepared the evening before. I was expecting perhaps some flowers, as she had given me a gorgeous rosemary plant back in the spring when I was in the midst of experimenting and perfecting my Rosemary Focaccia. What I found instead was a small container of what looked like wallpaper paste, which was 100 grams of Sourdough Starter, along with a note instructing me to store it in the refrigerator and that I would need to “feed” it weekly. I was grateful, but a tad anxious, since I had managed to kill the rosemary plant in a few short weeks and now I had what was basically a new “pet” that I was responsible to keep alive. I dutifully popped it in the fridge and figured I had a week to learn what my new friend liked to be fed to stay healthy.
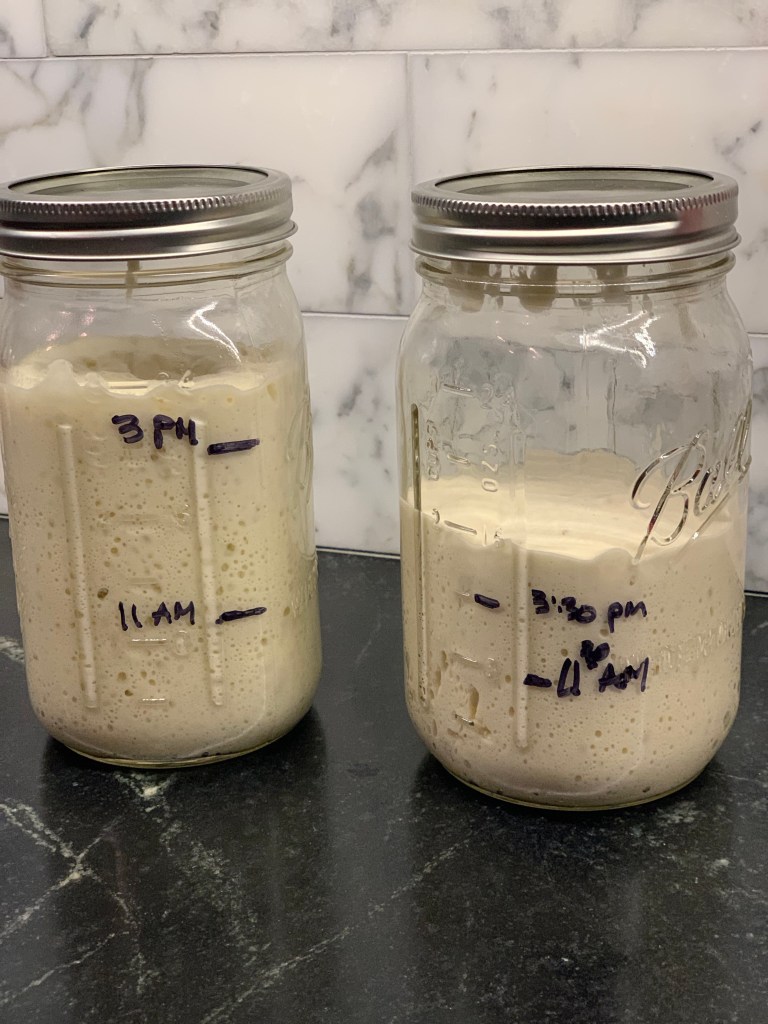
After about a week, I noticed the lid kept popping off of the container and a layer of liquid had formed on top. I reached out to Jenny and she advised that it was probably telling me that it needed to be fed. I took a few notes and then consulted a few websites to learn more, and immediately became confused as there are so many different recipes for maintaining sourdough starter and most strongly suggest the use of a kitchen scale for precise measurements or risk of failure. As I’ve mentioned previously, I much prefer cooking to baking for the very reason of the precision required for baking, so I wasn’t sure about this “gift” at this point, as it was beginning to feel like more of a project. I managed to find a site that gave suggested measures in ounces and cups, so I commenced with the first feeding and then waited to see if anything happened. I was delighted to see that in a short time the mixture was rising and in four hours had doubled- I hadn’t killed it! I called Jenny to report my success and she told me that this starter is strong stuff, hers having come from her sister in law in San Francisco, who in turn received it from her sister in law in Louisiana.


Now that I had fed my starter and it was flourishing, it was time to bake. With the only ingredients being flour, water, salt and the starter (which is simply flour and water), I was’t sure how this was going to end up with tasty bread, but I figured I had nothing to lose and I owed it to my thoughtful friend to give it a go. The dough seemed pretty sticky, but I resisted the temptation to add more flour since my focaccia also has a sticky dough and it comes out crunchy and delicious every time.


Voila! Sourdough Bread! I wasn’t sure how it would taste, but it was delicious and reminded me of my grandfather (Papa), who used to bring back sourdough bread when he traveled to San Francisco. Dennis popped some in the toaster and said it was “awesome”, so I toasted up a slice and made avocado toast, which was so tasty. After the initial success, I decided to try to recreate the fantastic olive bread that Publican Quality Meats sells (from Publican Quality Breads, not open for retail sales) which I love and use to make decadent croutons for my Caesar Salad. The first one needed a little work with the olive distribution, but it tasted exactly like PQM’s and the croutons were great. When you feed your starter you are supposed to discard all but 1/2 cup, so I’ve since been re-gifting to friends, though the batch I sent to my sister in law never arrived, so we think it might be a science project gone wrong. . . the starter may have been too active for shipping and actively fermenting exploded. SO, I’ll try again, but make sure it is in a container with plenty of room to expand, after all it is a living thing!

First batch, the one on the left proofed in a wide bowl, so was flatter. 
I took a stab at an Olive loaf – no need to buy at PQM anymore! 
Avocado Toast – yum! Even better with a few drops of hot sauce. 
Croutons for Caesar Salad – so good!

SOURDOUGH BREAD
Equipment
- Dutch Oven (I use a 5 1/2 quart Le Creuset)
- Large Bowl
- DRY Measuring cups
- Measuring spoons
- 2 Cup or larger LIQUID measuring cup
- Rubber spatula (or Spoonula)
- Disposable kitchen gloves (I like the Nitrile ones)
- Parchment Paper or Baking Sheets (I prefer the individual parchment baking sheets, so much easier)
Ingredients
- 1/3 Cup Sourdough Starter heaping
- 1 3/4 Cups Water (warm) (make sure the water is not above 120*)
- 4 1/4 – 4 1/2 Cups Bread Flour (start with 4 1/4 cups)
- 2 tsp fine Sea Salt
Instructions
- If it has been a while since you fed your starter, then you will need to feed it 8 hours before baking to ensure it has at least doubling in size, which means it is strong enough to make the bread rise. If you have been feeding your starter regularly, you can use it straight from the fridge as long as it has been fed within 7 days.

- Place 4 1/4 cups of flour and 2 tsp of sea salt in a large mixing bowl.
- Measure a heaping 1/3 cup of the starter in a dry measuring cup. It will be quite sticky. Add the starter to the water, after a couple of seconds it should float, which means your starter is strong and active.

- Whisk the starter and the water together until the starter is dissolved and you have a murky liquid.

- Mix the wet and dry ingredients with a rubber spatula (Spoonula) until a shaggy dough begins to form. The dough will be quite stiff and at this point you may wish to ditch the spatula and use your hands.

- Using your hands (with disposable gloves), knead the dough until all of the flour is incorporated and there are no dry streaks or lumps. If the dough is sticking to your gloves (and to the sides of the bowl), add more flour, 2 TBSP at a time and work it into the dough.

- Continue to add a bit more flour until the dough no longer sticks to your gloves or the sides of the bowl.

- Continue to knead the dough until it is fairly smooth and form it into a ball.


- Cover the dough with plastic wrap or a damp kitchen towel and allow to proof for at least 8 and up to 12 hours in a warm place free of drafts. The ideal temperature is 70-80*.
- After "proofing" your dough should have risen and approximately doubled. It should have a curved dome and look a bit like a distended belly. If you gently poke it with a floured finger, it should slowly come back.

- Line a clean bowl with baking parchment. Make sure to use a parchment that can take high heat, as you will be baking at 450-475*. I prefer the brand IF YOU CARE, available at Whole Foods, Target, Amazon and many other specialty stores and buy the pre-cut sheets, which are so much easier to work with.
- With wet fingers (or using gloves), scrape the dough away from the bowl and gather it into a ball. Grabbing one side, lift it with both hands and raise it high above the bowl and allow it to stretch. As it returns to the bowl, fold it over itself. It will be sticky, but should not be too loose or stick to the bowl once you gather it together. If it is sticking to the bowl, add a touch more flour, a tablespoon at a time.

- Wait about 90 seconds and repeat the stretching 2 more times. (During the 3rd stretch, the dough may not stretch as high and may require you to pull from all sides.) After the 3rd stretch, mound the dough into the parchment lined bowl, shaping it so the "seam" is on the bottom. Dust the dough lightly with flour and place in the refrigerator while you heat your dutch oven.

- At this point you may refrigerate your dough for up to 3 days before baking.
- Heat oven to 475* (or 450* on convection setting, which is what I use).
- Place the dutch oven (covered) in the oven while it is preheating and allow it to heat for 45 minutes to an hour.
- When the oven is ready, remove the dough from the refrigerator. Using kitchen shears or a very sharp knife, cut a long slice in the top of the dough or several slices to make an X or flower pattern.

- Carefully remove the dutch oven and remove the lid. Lift the dough by the corners of the parchment and place in the dutch oven. (I leave the dutch oven on the rack and remove the lid, drop in the dough and replace the lid.)
- Cover and bake for 25 minutes.

- Remove lid and bake for an additional 15-20 minutes until dark golden brown.

- Remove to a rack and allow to cool for an hour before slicing.
Notes
- If you are lucky enough to have a friend (like me) to share starter with you then you are good to go. I have shared my starter with many friends, who have shared with others, so it has proliferated all over the place now. I’m happy to send some to you if you don’t know someone who has some. Otherwise, if you’re have the time and up for the challenge, you can easily make your own starter in about a week. There are many websites, including King Arthur, that provide instructions.
- If you keep your starter in the fridge and it has been fed within the past 7 days, you can use it directly from the fridge, but I have found better results when I leave the starter on the counter for about a 1/2 hour before preparing the dough. you should notice it rising while it comes to room temperature.
- THE FLOAT TEST – if you are not sure if your starter is good to make bread or needs to be fed, try dropping a spoonful of starter into a cup of warm water. Wait a minute or so, and if the dollop floats to the top, then your starter is strong enough to make bread – bake away!
- I have found my best loaves are made with starter that has been fed within 4 days, as they seem to rise a bit higher producing loaves that a little less dense.
- Friends have suggested that once they have formed their loaf they let the dough rise a little bit more (another couple hours on the counter) and get fluffier loaves.
- FEEDING YOUR STARTER – Once a week or each time you bake
- Mix 1/2 Cup starter with 3/4 Cup plus 2 TBSP All purpose flour and 1/2 Cup warm water.
- Place into a wide mouth mason Jar (1 quart) and place the cover askew to allow air to get in. Let sit in a warm place for up to 8 hours or until it has doubled in size.
- Secure the cover and store in the refrigerator until you are ready to bake.
- Discard the remainder of the old starter or share with a friend or discover a recipe that calls for “sourdough discard”.
- There is no limit to how frequently you can feed your starter. If you are baking frequently, you will need to feed it more frequently since you will only have enough starter to make 2 loaves of bread and still have enough to feed and keep it going.
- NEED MORE TIME? Once you have formed your loaf, you can refrigerate it for up to 3 days before baking. I have also found that by placing my dough in my kitchen in the winter (which is about 60*) that the proofing can go as long as 16 hours without overproofing . , , or just pop it in the fridge.
- IN A RUSH? You can speed up the proofing process by placing your dough in a warmer environment . . . in the summer I place mine in our sunroom which does not have air conditioning and it is ready in 8 hours . . . I also tried putting it in the garage on a hot day (securely covered, of course) and it was ready in 6 hours. DO NOT place it in your oven with the light on, as it will get too warm and overproof.
- OLIVE BREAD
- Substitute 1 1/4 Cups Whole Wheat flour for a cup of the Bread flour (ie: 3 Cups bread flour and 1 1/4 Cups whole wheat flour).
- Stretch the proofed dough as above, but after the 3rd stretch turn it onto a lightly floured surface and press out (like you’re making pizza).
- Sprinkle 1 Cup mixed pitted olives and press in lightly. (I like to use a blend of pitted Castelveltrano and Kalamata olives, but experiment with what you like.)
- Roll the dough over, jelly roll style and then form into a ball, securing the seam at the bottom, place in the parchment lined bowl, dust with flour and place in the fridge while the dutch oven heats and bake in the same manner as above.

All these people who say how easy this is obviously didn’t tell me about the starter part! Patience!! Looks amazing.
Pingback: SOURDOUGH BREAD – KTINA'S KITCHEN